Introduction
In this episode of “Fixing a Faulty Blu-ray Drive,” the issue with the drive will be addressed. The original drive, which is in a dirty condition, will be examined. The purpose of this blog post is to provide a step-by-step guide on fixing the Blu-ray drive. In this episode, the plan is to fix the drive by conducting a board diagnostics or potentially a remarry of the current board. By following along, readers will gain insights into troubleshooting and repairing common Blu-ray drive problems.
Identifying the Problem
The first step in fixing a faulty Blu-ray drive is to identify the problem. In this episode, the author of the blog post noticed several issues with the drive that needed to be addressed.
Firstly, the drive was making funky noises, as if the disc was being read by the laser. However, despite these noises, the drive was not spinning. This indicated a mechanical issue within the drive itself.
Secondly, the drive was accepting the disc, suggesting that the laser was functioning properly. However, the lack of spinning prevented the drive from properly reading the disc.
The author expressed curiosity about how this issue could occur. It seemed odd that the drive would make noises and accept the disc, but still fail to spin properly. Further investigation was necessary to determine the root cause of the problem.
Possible Causes
There are several potential causes for the issues observed in the Blu-ray drive:
- A malfunctioning motor could be preventing the drive from spinning.
- There may be a problem with the drive’s laser, despite it accepting the disc.
- Wear and tear or damage to the mechanical components of the drive could be causing the issue.
Identifying the exact cause of the problem will require further testing and diagnostics, which will be explored in the next episode of “Fixing a Faulty Blu-ray Drive.”
Testing with a Donor Drive
After identifying multiple issues with the original Blu-ray drive, the author decided to try using an old daughter board with a new drive to see if it would solve the problem.
By using the old daughter board, they hoped to determine whether the issue was with the board itself or with another component of the drive.
Upon testing the new drive with the old board, it became clear that the board was indeed the source of the problem. The drive still made funky noises, but it remained unable to spin.
This outcome confirmed the suspicions of the author and provided valuable insights into the troubleshooting process.
In future episodes, the author plans to delve deeper into board diagnostics and potentially explore the option of repairing or remarrying the faulty board.
By addressing these board-related issues, the author hopes to fix the Blu-ray drive and provide readers with a comprehensive guide on troubleshooting and repairing common problems.
Stay tuned for the next episode of “Fixing a Faulty Blu-ray Drive” to learn more about the board diagnostics and potential repair techniques.
Repairing and Replacing Components
The focus of repair in this episode of “Fixing a Faulty Blu-ray Drive” is the original drive. Despite being in a dirty condition, the author is determined to fix it and get it working again.
Upon examining the drive, the author identified multiple problems that needed to be addressed. Firstly, the drive was making funky noises, indicating that the disc was being read by the laser. However, the drive was not spinning, pointing to a mechanical issue within the drive itself.
Secondly, the drive was accepting discs, suggesting that the laser was functioning properly. However, the lack of spinning prevented the drive from reading the discs effectively.
To tackle these issues, the author has come up with a plan to replace chips and components on the board. By replacing the faulty components, they hope to restore the drive to proper working order.
Despite the challenges, the author remains optimistic about the repair. They believe that by addressing the identified problems and replacing the necessary components, the Blu-ray drive can be successfully fixed.
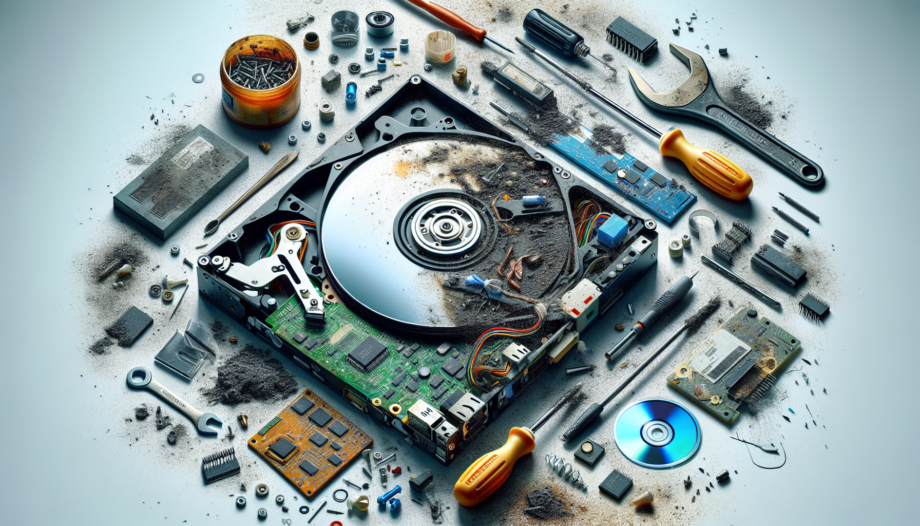
Visual Aids
In order to provide clarity and a better understanding of the repair process, additional screenshots and images will be included in this section.
Firstly, there will be screenshots showcasing the original drive and the donor drive side by side. This will allow readers to compare the two and see the differences in their conditions.

Next, specific chips and components that need to be replaced will be highlighted in the images. This will help readers identify the exact areas of focus during the repair process.

Finally, before and after visuals of the repair will be emphasized. This will demonstrate the transformation of the faulty Blu-ray drive to its repaired state, giving readers a sense of accomplishment and satisfaction.

By including these visual aids, readers will have a clearer understanding of the repair process and can follow along more effectively. The screenshots and images will serve as a visual guide, complementing the step-by-step instructions provided in earlier sections of this blog.
Conclusion
The second episode of “Fixing a Faulty Blu-ray Drive” made significant progress in addressing the issues with the drive. The author identified multiple problems with the original drive, including funky noises and a lack of spinning. Through testing with a donor drive, it was confirmed that the board was the source of the problem.
In the upcoming episode, the author plans to delve deeper into board diagnostics and potentially explore the option of repairing or remarrying the faulty board. This will provide readers with valuable insights into troubleshooting and repairing common Blu-ray drive problems.
Stay tuned for the next episode to learn more about board diagnostics and potential repair techniques. The author encourages readers to continue following the series for a comprehensive guide on fixing Blu-ray drive issues.
Thank you for your support and interest in “Fixing a Faulty Blu-ray Drive.” Your continued engagement keeps the author motivated to provide helpful content.
Video Link
To gain a better understanding of the troubleshooting and repair process for fixing a faulty Blu-ray drive, the author encourages readers to watch the related video. The video provides a step-by-step guide, visual aids, and additional insights into the issues faced with the drive.
By watching the video, readers will have easy access to the content and can follow along with the instructions more effectively. The video also showcases the original drive and the donor drive, highlighting the differences in their conditions.
Click here to watch the video and gain more details about addressing common Blu-ray drive problems.